

Building an End-to-End Ingestion Pipeline with Databricks Lakeflow Connect: AWS S3 to the Lakehouse
A hands-on walkthrough of moving data from Amazon S3 into Databricks using Lakeflow Connect’s standard connector approach.
Status: This post was written step-by-step alongside a real pipeline build — from the S3 source bucket through governed access, both ingestion modes, and final SQL validation of the resulting tables.
This post walks through building a governed ingestion pipeline from an AWS S3 bucket into the Databricks lakehouse using Lakeflow Connect, comparing the two ways to bring files in:
- Governed access first — Unity Catalog storage credentials and external locations provide secure, centrally-managed access to the S3 bucket, verified with a built-in permissions test before any data moves.
- One-time ingestion is a simple, on-demand batch load — a good fit for known, bounded drops (e.g., a monthly file), where schema is recomputed fresh on each manual run.
- Scheduled ingestion spins up an actual streaming table backed by a Lakeflow pipeline, continuously picking up new files and automatically evolving its schema as new columns appear — no manual re-run required.
- Not CDC — this pipeline is append-only file ingestion, not change data capture. Databricks’ AUTO CDC in Lakeflow pipelines is the purpose-built tool for update/delete change-feed processing.
- Result — both paths land as ordinary, governed, queryable Delta tables in Unity Catalog, demonstrating how Lakeflow Connect handles the operational complexity behind a simple wizard.
Why Lakeflow Connect?
Databricks Lakeflow Connect is the ingestion layer of the Lakeflow platform, and it comes in two primary flavors:
- Managed connectors — point-and-click, low-maintenance connectors for common SaaS applications and databases (Salesforce, Workday, SQL Server, PostgreSQL, and so on), where Databricks handles most of the orchestration for you.
- Standard connectors — a more flexible set of tools for sources like cloud object storage, where you get more control over how ingestion is configured. For AWS S3 specifically, this means using Auto Loader, Databricks’ incremental file-ingestion engine, wired up through Unity Catalog.
This post covers the standard connector path: bringing files that land in an S3 bucket into Databricks as governed Delta tables, end to end.
The Scenario
For this walkthrough, the source is an S3 bucket (pra-s3-bucket1) that receives two kinds of monthly data drops:
- employees_july/ — employee records for July
- sales_july/ — sales records for July
The goal is a repeatable pipeline that picks up new files from these folders and lands them as clean, queryable tables inside Databricks, governed by Unity Catalog.
Architecture at a Glance
At a high level, the pipeline looks like this:
AWS S3 (source files) → Unity Catalog storage credential + external location (secure, governed access from Databricks to the bucket) → Lakeflow Connect ingestion pipeline (Auto Loader) (incremental read + schema handling) → Delta tables in a Unity Catalog catalog/schema (queryable, governed destination) → Downstream consumption (SQL, dashboards, ML)
Each of these stages is covered below, with screenshots from the actual setup.
Step 1: The Source — an S3 Bucket with Monthly Drops
Everything starts on the AWS side. The source is a standard S3 bucket, pra-s3-bucket1, containing two folders for this batch of data:
- employees_july/
- sales_july/
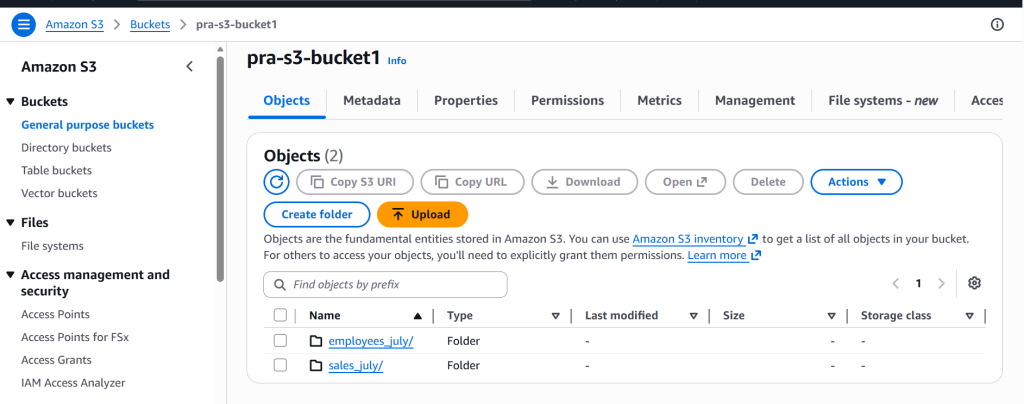
At this stage, there’s nothing Databricks-specific happening yet — it’s just an ordinary bucket. The important groundwork for the pipeline is making sure the folder structure is predictable (one prefix per dataset), since that structure is what Lakeflow Connect / Auto Loader will later point at on the Databricks side.
Step 2: Connecting Databricks to S3 — Storage Credential and External Location
Before Databricks can read anything from the bucket, Unity Catalog needs a governed, secure path to it. This is done with two objects:
- A storage credential — wraps the IAM role that grants Databricks permission to access the bucket (this is the .. credential referenced below).
- An external location — maps a specific S3 path to that credential, so Unity Catalog knows exactly which bucket(s) a given credential is allowed to touch, and which principals can use it.
In this setup, the external location db_s3_external_databric was created pointing at s3://pra-s3-bucket1/, using the db_s3_credential… storage credential:
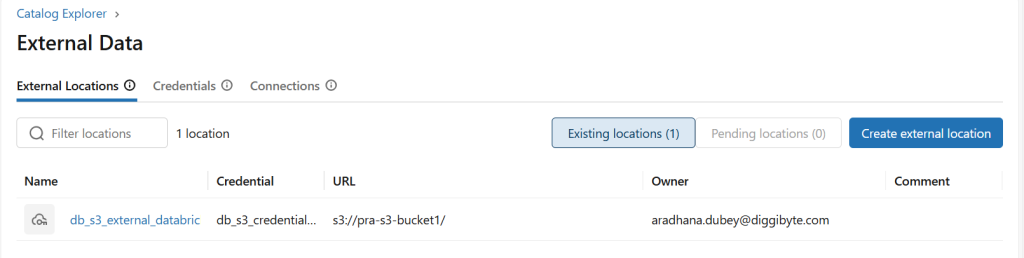
This is the piece that makes the whole pipeline governed rather than a one-off script with hardcoded keys: access to the bucket is defined once, centrally, in Unity Catalog, and every downstream ingestion pipeline, notebook, or query re-uses the same credential instead of managing its own S3 secrets.
Opening the external location’s Overview tab shows the full picture:
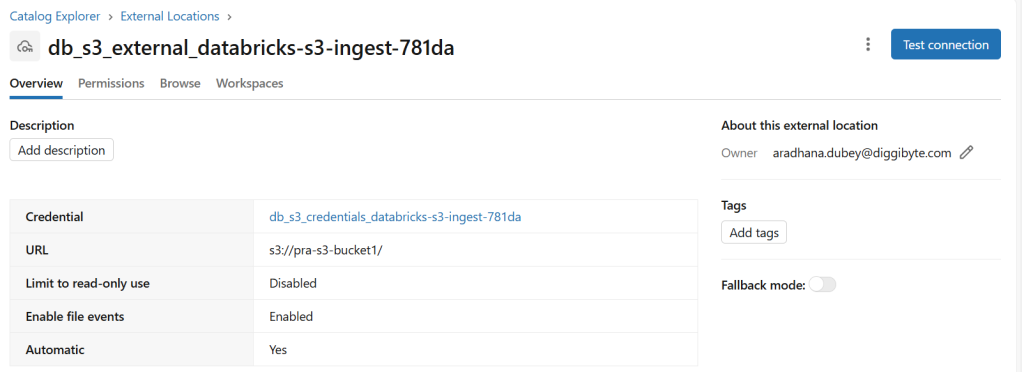
Two settings here matter for the pipeline design later on:
- Limit to read-only use is left disabled, so this credential could also be used for writes if needed — worth locking down to read-only in a production setup if the pipeline is meant to be ingest-only.
- Enable file events is turned on, with Automatic set to Yes. This lets Unity Catalog register S3 file-notification events for the location, which is what makes efficient, low-latency incremental ingestion (rather than repeatedly listing the whole bucket) possible later.
Before trusting the external location, it’s worth running Databricks’ built-in Test connection check, which validates every permission the storage credential needs — read, list, write, delete, path existence, file events, and the underlying IAM role assumption:
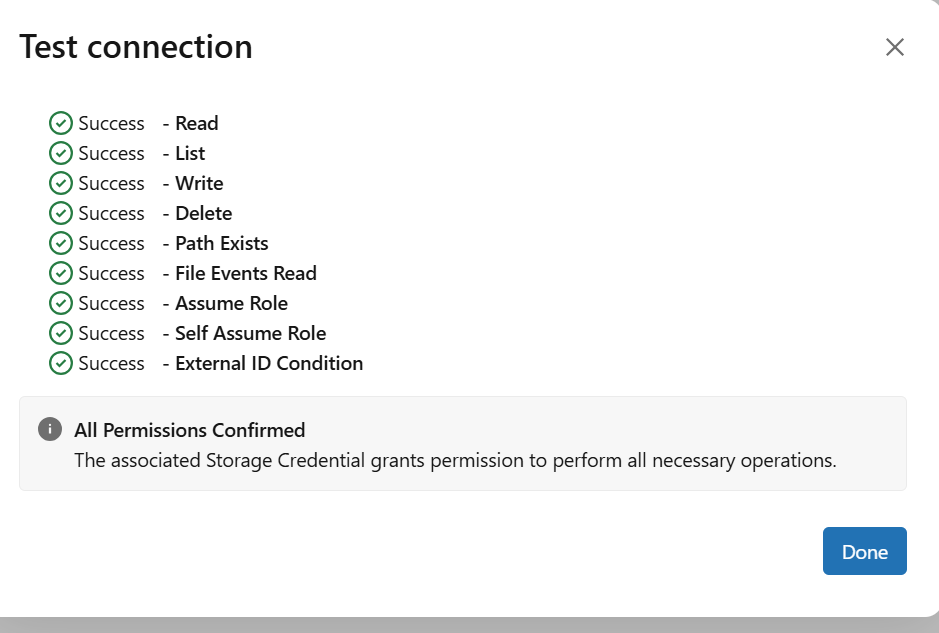
With every check green, Databricks has a fully verified, governed path into pra-s3-bucket1 — the next step is to actually build the ingestion pipeline that reads from it.
Step 3: Launching the S3 Ingestion Pipeline from Data Engineering
With the connection verified, the next step moves from Catalog Explorer to the Data Engineering workspace, under Data Ingestion. This is where Lakeflow Connect’s connector catalog lives — a mix of standard connectors for files/object storage (like Amazon S3) and managed connectors for SaaS apps and databases (Salesforce, SQL Server, Google Analytics, and others):
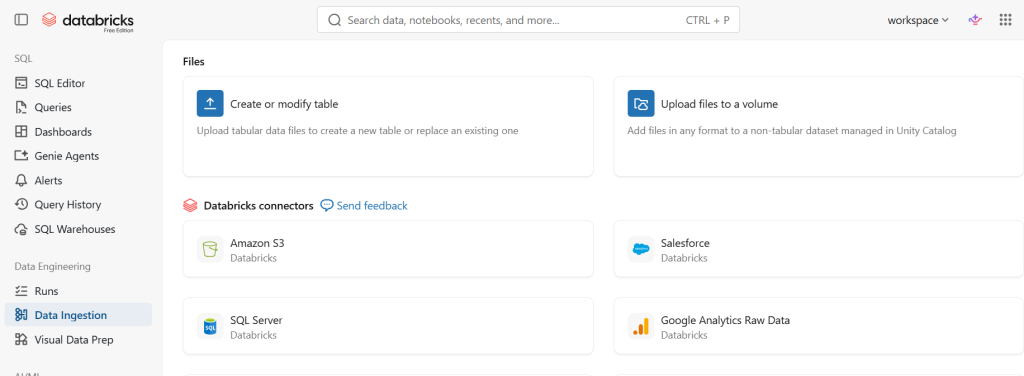
Selecting the Amazon S3 tile kicks off the guided “Add data” flow for building an S3 ingestion pipeline.
Step 4: Configuring the S3 Ingestion — Mode and Source Folders
The Ingest from S3 screen is where the external location from Step 2 gets put to use. It asks for two things up front:
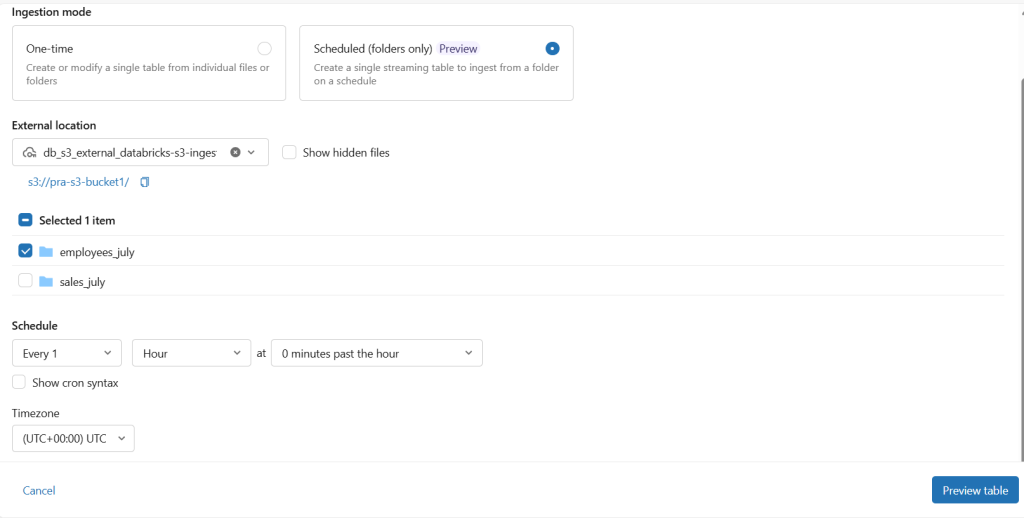
Ingestion mode: – One-time — create or refresh a single table from a specific set of files or folders, run on demand. – Scheduled (folders only) (Preview) — create a streaming table that continuously ingests new files landing in a folder, on a schedule.
Source folders, browsed directly from the external location:
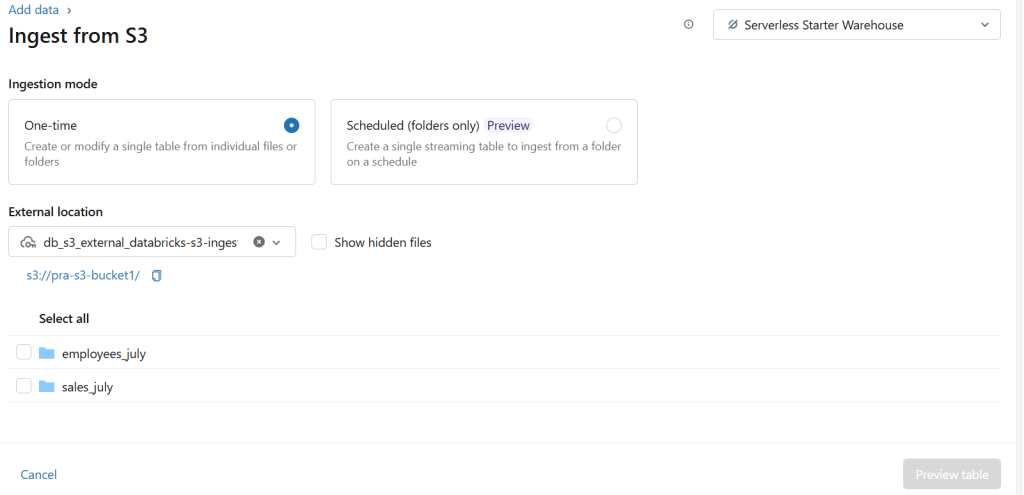
Here, both employees_july and sales_july are available as selectable sources, browsed straight out of the bucket via the external location — no separate S3 credentials needed at this step, since Unity Catalog already governs that access. Selecting a folder and continuing moves into destination mapping and a preview of the table before it’s created.
A Closer Look: One-Time vs. Scheduled Ingestion — and How Schema Is Actually Handled
The One-time vs. Scheduled (folders only) choice isn’t just about “run now vs. run later” — the two modes are backed by genuinely different engines underneath, and that changes how schema inference and schema evolution behave. This pipeline used One-time, so it’s worth being explicit about what that means, and what would have been different with the other option.
One-time ingestion (what this pipeline uses)
- Each run is a self-contained batch job: Databricks samples the selected files, does a best-effort schema inference (column types are auto-detected from file content when “automatically detect column types” is enabled), and — when more than one file is involved — infers a schema per file and merges them.
- There’s no persisted schema history between runs. Create new table builds the table fresh from whatever’s in the selected folder(s) right now; Overwrite existing table (the option shown in Step 6) does the same thing again — it re-infers schema from the current file set and replaces the table, rather than diffing against the previous schema.
- Practically, that means schema “evolution” here is manual: if sales_july/ later gains a new column, nothing happens automatically. You’d need to come back, choose Overwrite existing table, and let it re-infer — at which point the new column shows up because the whole schema was recomputed from scratch, not because it was incrementally merged in.
- This makes One-time mode a good fit for exactly what it’s being used for here: known, bounded monthly drops where a human decides when a refresh happens.
Scheduled (folders only) — the streaming alternative
- This mode creates an actual streaming table, backed by Auto Loader running inside a Lakeflow pipeline. Instead of a one-off batch read, it maintains an incremental, continuously-running (or scheduled-trigger) process over the folder.
- Auto Loader infers its initial schema by sampling up to the first 50 GB or 1,000 files it finds (whichever comes first), and then — critically — persists that schema in a dedicated schema-tracking location, so it doesn’t have to start from zero on every micro-batch.
- New files are checked against the tracked schema, and Auto Loader’s schemaEvolutionMode setting decides what happens on a mismatch:
- addNewColumns (the default) — the stream stops with an UnknownFieldException after Auto Loader adds the new columns; when configured with Lakeflow Jobs (recommended), it restarts automatically with the updated schema.
- addNewColumnsWithTypeWidening (Public Preview, DBR 16.4+) — same, but also safely widens compatible types (e.g., an int column that starts seeing long values).
- rescue — the schema never changes; anything that doesn’t fit the known schema is captured in a _rescued_data column as a JSON blob instead of breaking the pipeline or silently getting dropped.
- failOnNewColumns — the pipeline stops hard until someone manually updates the schema.
- none — new columns are ignored unless a rescued-data column is explicitly configured.
- Because it’s a true streaming table, each file/row is processed once as it arrives — this is also why the external location’s Enable file events / Automatic settings from Step 2 matter: they let Databricks discover new files via S3 event notifications instead of repeatedly re-listing the whole bucket, which is what makes low-latency scheduled ingestion efficient.
- By design, streaming tables process each row exactly once for maximum efficiency; reprocessing historical data — for example after changing the pipeline’s transformation logic — is available via an explicit full refresh when needed.
Summed up: One-time trades automatic schema handling for simplicity and control — you decide exactly when the schema gets recomputed, and it’s recomputed wholesale each time. Scheduled trades that manual control for a persisted, incrementally evolving schema that can absorb new columns (or safely quarantine surprises via the rescued-data column) without anyone re-running anything by hand. For a one-off monthly file drop like employees_july/ and sales_july/, one-time is the simpler and arguably more appropriate choice; for a folder that receives new files continuously and unpredictably, the scheduled/streaming mode is the one designed for that.
Step 5: Mapping to a Destination — Catalog, Schema, Table Name, and Live Preview
After a source folder is selected, the wizard moves to the destination screen — and this is where Lakeflow Connect earns the “standard connector, higher customization” label from earlier: it doesn’t just dump files into a default location; it lets you place them precisely inside Unity Catalog and shows you the data before committing to anything.
For the sales_july folder, the destination was set to:
- Catalog: landing
- Schema: default
- Table name: sales_july — auto-populated from the folder name, and editable
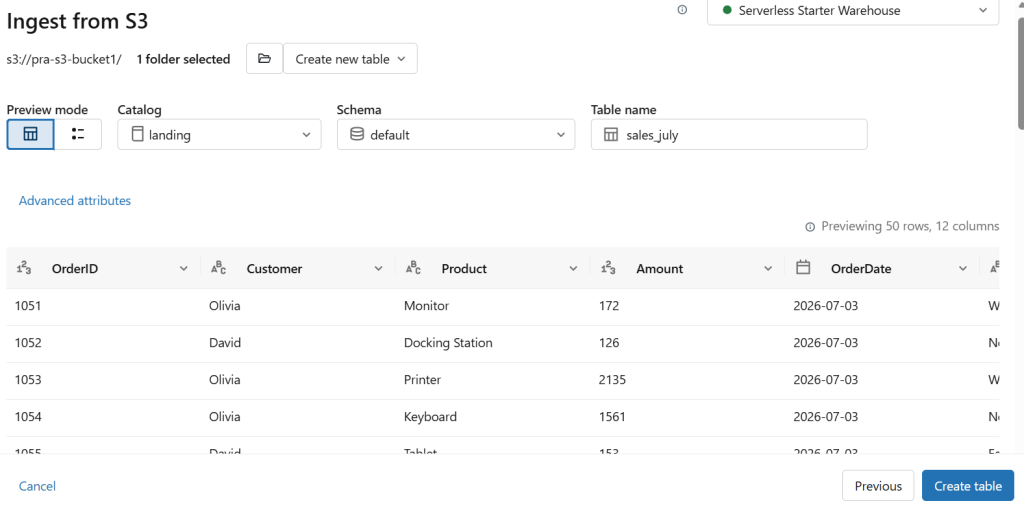
The preview is a genuinely useful safety net: before any table is created, Databricks infers a schema from the source files and renders a sample — here, 12 columns and a 50-row preview showing order data (OrderID, Customer, Product, Amount, OrderDate, and more). It’s a chance to catch a schema-inference problem or a wrong folder selection before the pipeline actually runs.
Step 6: Create New Table vs. Overwrite Existing Table
Next to the folder picker sits a small but important control: a dropdown for how this run should behave against the destination table.

This matters specifically because the pipeline is running in One-time mode (from Step 4) rather than the scheduled/streaming mode:
- Create new table — used the first time a folder is ingested, when the destination table doesn’t exist yet.
- Overwrite existing table — used on a subsequent one-time run against a folder that’s already been ingested, replacing the table’s contents with a fresh read of the source folder.
Because one-time ingestion doesn’t automatically pick up new files the way the scheduled/streaming mode does, this toggle is effectively how you “re-run” the pipeline by hand when the S3 folder gets new data later.
Step 7: The Result — Verifying the Table in Catalog Explorer
Clicking Create table runs the ingestion, and the new table shows up immediately in Unity Catalog under landing.default, alongside the employees_july table created the same way from the other source folder:
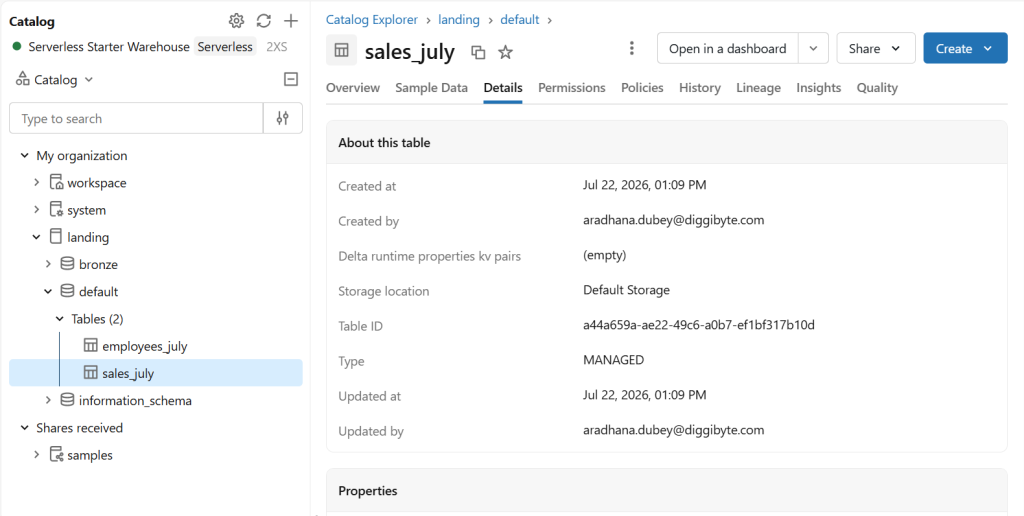
A couple of details worth calling out on the Details tab:
- Type: MANAGED — Databricks is managing this table’s storage in the metastore’s default location, rather than the data staying in place at s3://pra-s3-bucket1/sales_july/. The ingestion pipeline copies the source files into a governed Delta table rather than just referencing them in place.
- Created by / Created at — standard Unity Catalog lineage metadata, useful for governance and auditing who ran the ingestion and when.
At this point, both source folders — employees_july/ and sales_july/ — have been turned into governed, queryable Delta tables, and the one-time ingestion path from S3 to Databricks is complete end to end.
Step 8: The Scheduled Path — Building emp_table as a Streaming Table
To see the other half of the ingestion-mode choice from Step 4, the same “Add data” wizard was run again against employees_july/ — this time picking Scheduled (folders only) instead of One-time.
Picking a Refresh Cadence, Not Just a Mode
Choosing Scheduled exposes a Schedule section that One-time never shows: a recurrence (Every 1 Hour, at 0 minutes past the hour) and a timezone (UTC). This is the tell that the two modes aren’t just different buttons on the same process — One-time is a manual, on-demand batch job, while Scheduled hands the folder off to Databricks to keep watching on its own.
Destination and Preview — Meet emp_table
The destination screen looks almost identical to the one-time flow, but with a “Scheduled ingestion” tag next to the folder picker as a reminder of which mode is active. The table was named emp_table (catalog landing, schema default), and the preview — 20 rows, 12 columns — surfaced employee data: EmployeeID, EmployeeName, Department, Designation, ManagerID, Email, and more.
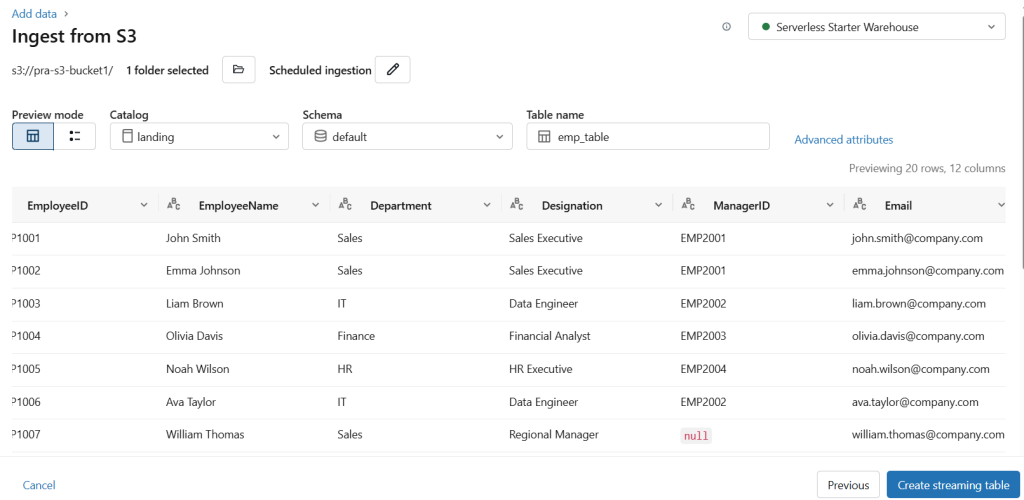
One detail worth calling out in that preview: William Thomas’s row shows ManagerID as null rather than causing an error or getting dropped. That’s schema inference and enforcement working as intended — a nullable field is allowed to be genuinely empty for a given row (a top-level manager with no manager of their own, in this case) without breaking the inferred schema for the rest of the column.
Also worth noticing: the button at the bottom now reads Create streaming table, not “Create table.” Same wizard, but it’s explicit about what kind of object it’s about to create.
Under the Hood: This Isn’t Just a Table, It’s a Pipeline
Once created, emp_table shows up in Catalog Explorer next to employees_july and sales_july — but its Details tab looks different from the one-time tables:
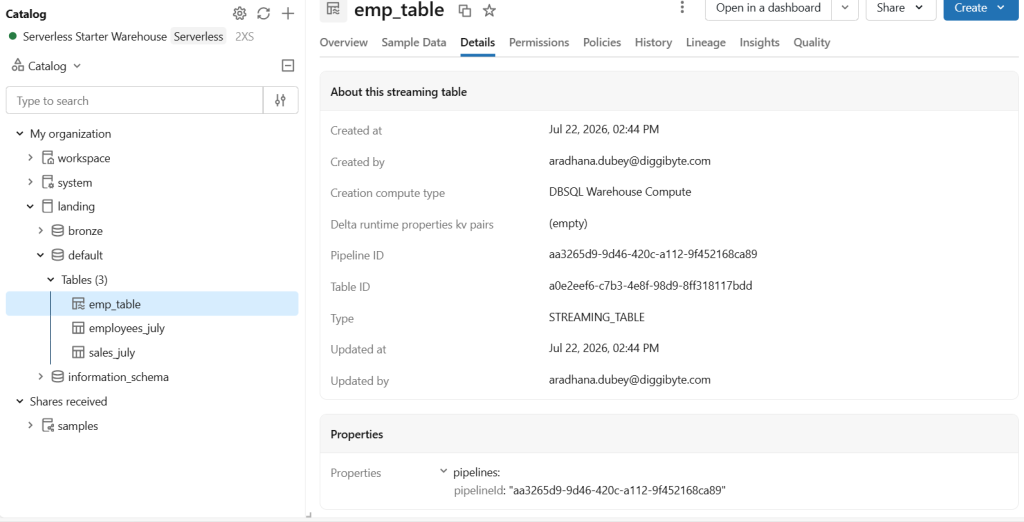
- Type: STREAMING_TABLE instead of MANAGED — confirming this table is backed by ongoing incremental processing, not a one-off copy.
- A Pipeline ID — because choosing Scheduled mode didn’t just create a table; it created and registered a Lakeflow pipeline to keep that table up to date. That pipeline shows up under Jobs & Pipelines as ST-landing.default.emp_table, with its own run history, a visual graph of the streaming table node, and per-run stats:
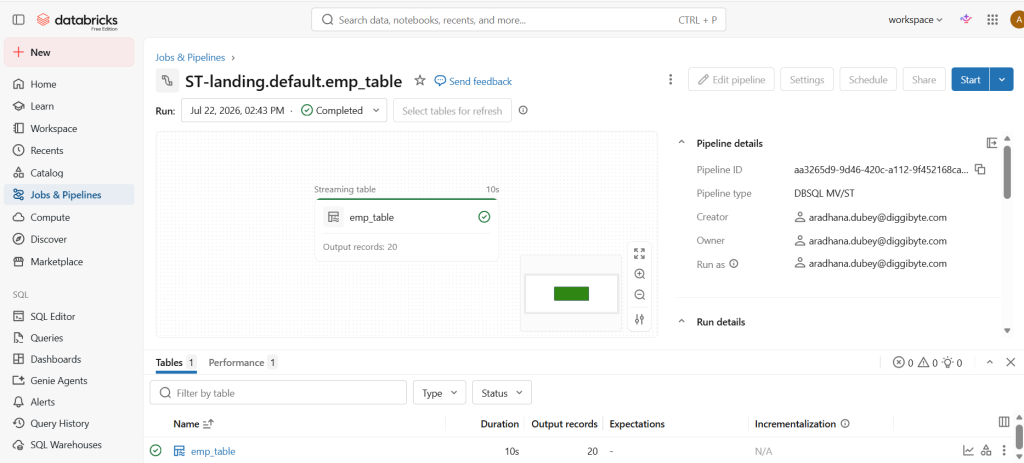
This is a meaningful, easy-to-miss consequence of picking Scheduled mode in the UI wizard: it’s not “the same table, refreshed automatically” — it’s a genuine standalone Lakeflow pipeline (pipeline type DBSQL MV/ST, the lightweight pipeline class the UI generates for a single materialized view or streaming table) that runs on the configured schedule, with its own monitoring, run history, and pipeline ID, completely separate from the one-time tables built earlier. The Incrementalization column showing N/A here is expected — that classification (incremental refresh vs. full recompute) applies to materialized views, not streaming tables, since a streaming table already processes new data incrementally by design via Structured Streaming rather than the cost-based refresh model materialized views use.
Is This CDC? Schema Enforcement and Evaluation, One More Time
It’s tempting to look at “streaming table + scheduled + incremental” and assume this is Change Data Capture (CDC) — it isn’t, and the distinction matters:
- What’s actually happening here is append-only incremental file Auto Loader watches employees_july/ for new or changed files and streams their contents into emp_table as new rows. It has no concept of “this row is an update to an existing employee” — it only knows about files arriving.
- True CDC in Databricks is a separate, opt-in capability — the AUTO CDC (formerly APPLY CHANGES INTO) APIs in Lakeflow Spark Declarative Pipelines. These are designed for sources that emit explicit change records (INSERT/UPDATE/DELETE/TRUNCATE) with a sequencing column. They automate building SCD Type 1 or Type 2 tables from that feed — the kind of thing you’d wire up against a database change feed (e.g., via Debezium) or a series of snapshots, not a folder of flat files.
- So if the source system later needs to update an existing employee’s Department rather than just append new hires, this simple folder-ingestion pipeline would just append another row rather than update in place. For update/delete semantics, Databricks provides AUTO CDC in Lakeflow pipelines, purpose-built for change feed processing — fed by a source that actually communicates change events, rather than relying on Auto Loader’s plain append-only stream.
On the schema side, the same rules from the “Closer Look” section earlier apply, now visibly in action: schema was inferred once from the initial file sample, is being tracked in Auto Loader’s schema location, and will evolve automatically (per whatever schemaEvolutionMode the pipeline is using) if a future file in employees_july/ introduces a new column — no manual “Overwrite existing table” step required, unlike the one-time tables built earlier.
Step 9: Querying and Validating the Data
The last step is the simplest one: prove the pipeline actually worked by querying the tables like any other data in the warehouse — no special syntax, no awareness required that one of them is a streaming table under the hood.
SELECT * FROM landing.default.sales_july LIMIT 10;
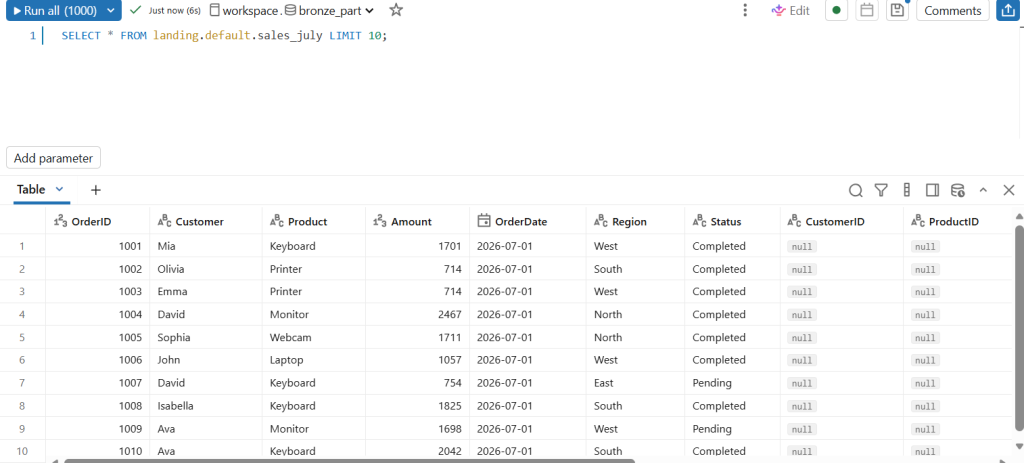
This surfaced a fuller picture of the sales_july schema than the ingestion preview showed back in Step 5 — alongside OrderID/Customer/Product/Amount/OrderDate, there’s also Region, Status, CustomerID, and ProductID. Interestingly, CustomerID and ProductID come back null for every row in this sample. That’s schema inference and enforcement holding up under a slightly harder case than the single-null-value example from Step 8: an entire column can be present in the inferred schema and genuinely empty of data, without Databricks dropping the column, erroring out, or treating it as “missing” — it’s just a nullable field nobody happened to populate in this batch.
SELECT * FROM landing.default.emp_table LIMIT 10;
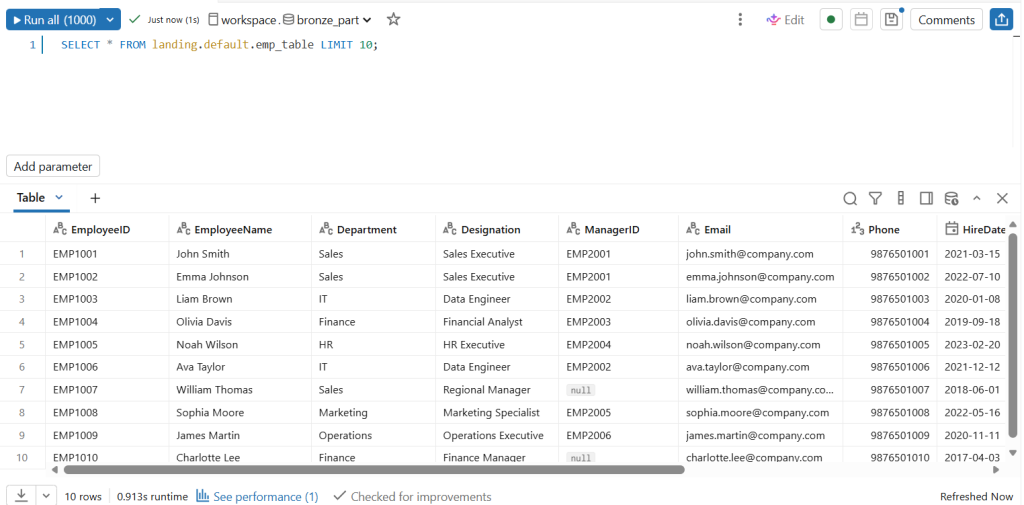
Same story on emp_table, the streaming table from Step 8: it queries exactly like a normal table — SELECT * … LIMIT 10 with no mention of streaming, Auto Loader, or the pipeline behind it. This wider sample also turns up a second null ManagerID (Charlotte Lee, alongside William Thomas from before), reinforcing that this is a real, recurring pattern in the source data rather than a one-off — and one the inferred schema handles the same way every time.
Both tables being fully and ordinarily queryable is really the point of everything upstream: the external location, the credential, the ingestion mode choice, the schema inference — all of it exists so that by the time someone opens the SQL Editor, sales_july and emp_table just behave like any other governed table in the lakehouse.
Closing Thoughts
Start to finish, this pipeline covered both faces of Lakeflow Connect’s standard-connector path from AWS S3:
- A governed connection into the bucket via a Unity Catalog storage credential and external location, verified with a full permissions test before anything else happened.
- One-time ingestion for a bounded, known monthly drop (sales_july/, employees_july/), where schema is inferred fresh on each manual run and “Overwrite existing table” stands in for re-ingestion.
- Scheduled ingestion for a folder that should stay current on its own (employees_july/ again, this time as emp_table), which turned out to spin up a real, monitorable Lakeflow pipeline behind a streaming table — with schema tracked and evolved automatically rather than recomputed by hand.
- A close look at what that scheduled/streaming mode is not: it’s incremental file ingestion, not Change Data Capture — a distinction worth keeping straight before assuming update/delete semantics that aren’t actually there.
- And finally, both outputs landing as perfectly ordinary, queryable Delta tables — the whole point of running any of this in the first place.
The choice between One-time and Scheduled isn’t really about which is “better” — it’s about matching the mode to how the source data actually arrives. A folder that gets one clean drop a month barely benefits from a standing pipeline; a folder that fills up unpredictably shouldn’t depend on someone remembering to click “Overwrite existing table.” Lakeflow Connect’s standard S3 connector makes both paths available from the same wizard, making it easy to build — and compare — them in the same walkthrough.