Building a Real-Time Chat App With Websocket and Node.JS

Building a Real-Time Chat App With Websocket and Node.JS

Building a Real-Time Chat App With Websocket and Node.JS

Want to build a live chat app like WhatsApp or Messenger? In this blog, we’ll show you how to create a simple real-time chat app using Node.js and WebSocket, with easy code samples and explanations. 

What are WebSockets? 

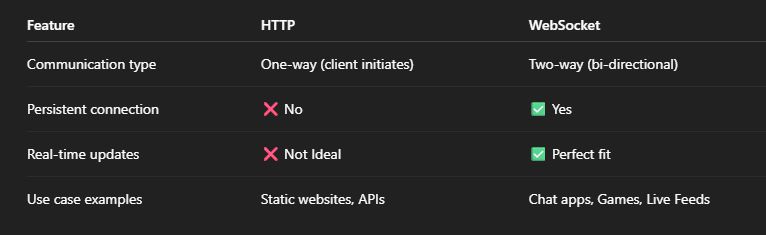
WebSockets are a way to create a continuous connection between the client (browser) and server. Unlike HTTP, where the client must always initiate the request, WebSocket allows two-way communication — like a phone call, not just a one-time message. 

With WebSocket, your app can send and receive data instantly, making it perfect for things like chat apps, live notifications, or online games. 

HTTP Request-Response Model vs. WebSocket: 

HTTP Request Response Model vs. WebSocket - websocket

Real-World Advantages & Use Cases of WebSockets: 

Advantages: 
  • Real-time communication 
  • Less overhead than HTTP polling 
  • Faster message delivery 
  • Maintains an open connection 
Use-Cases: 
  • Messaging/chat apps (e.g., WhatsApp) 
  • Live sports scores 
  • Collaborative tools (e.g., Google Docs) 
  • Online gaming platforms 
  • Stock/crypto tickers 

Why is Node.js Recommended for WebSockets? 

Node.js is: 
  • Fast (non-blocking, event-driven) 
  • Lightweight 
  • Great at handling multiple connections simultaneously 
  • Has popular WebSocket libraries like ws or socket.io 

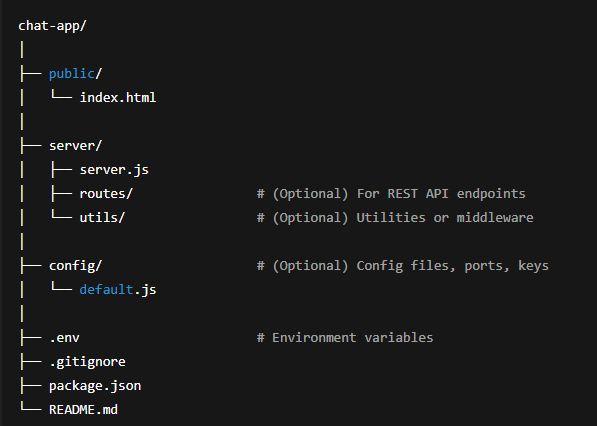
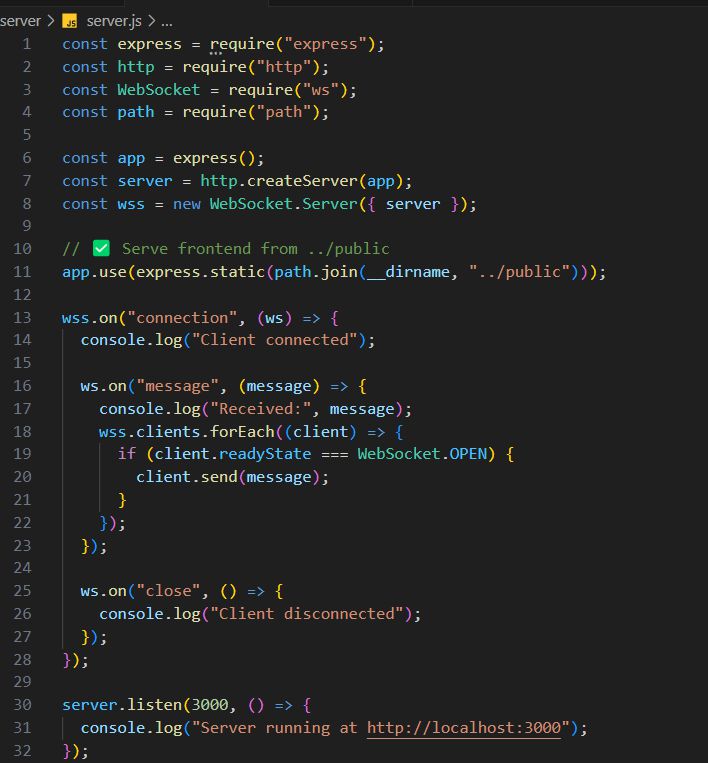
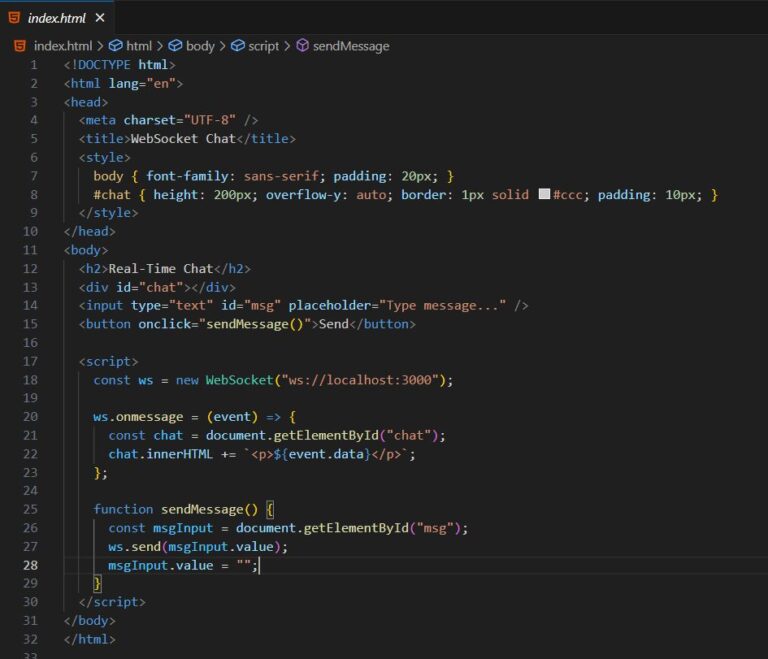
Step-by-Step Tutorial: Building a Real-Time Chat App 

Creating the Backend (Node.js + WebSocket) 
Step 1: Environment Setup 

Make sure Node.js is installed. 

  • node -v 
  • npm -v 

Create a project folder: 

  • mkdir chat-app
  • cd chat-app 
Step 2: Installing Dependencies 

Install Express and ws (WebSocket library): 

  • npm init  -y 
  • npm install express ws 
Step 3: Project Folder Structure 
Project Folder Structure - websocket
Step 4: Creating the Back-End Server 

Create a file server.js: 

Creating the Back End Server - websocket

Testing the Backend 

Run: node server.js 

You should see: 

Server is running on http://localhost:3000 

Step 5: Creating the UI of the Chat App 

public/index.html: 

Building a Real-Time Chat App With Websocket and Node.JS
Step 6: Implementing WebSocket on the Client Side 

You already did this with: 

const ws = new WebSocket(“ws://localhost:3000”); 

Result: 

  • Open http://localhost:3000 in two browser tabs. 
  • Type messages in one tab and see them instantly in both tabs. 

Conclusion: 

You just built a working real-time chat app using Node.js and WebSockets! Now that you’ve mastered the basics, you can: 

  • Add usernames 
  • Add timestamps 
  • Store messages in a database 
  • Deploy it using services like Heroku, Vercel, or Render 

-Suva Lakshmi
Full Stack Engineer