With the introduction of the Tabular Model Definition Language (TMDL) view in Power BI Desktop, implementing Object-Level Security (OLS) has become significantly more streamlined. Traditionally, OLS required the use of third-party tools such as Tabular Editor, making the process more complex. Now, OLS can be applied directly within Power BI Desktop, providing a more secure and manageable approach to protecting sensitive data without leaving the development environment.
This article offers a comprehensive, step-by-step guide for configuring Object-Level Security using the TMDL view within Power BI Desktop.
Understanding Object-Level Security:
Object-Level Security (OLS) enables the restriction of access to specific tables or columns within a data model. This differs from Row-Level Security (RLS), which limits access to individual records. OLS ensures that restricted data objects are completely invisible to users who do not have appropriate permissions, including from report visuals and metadata panels.
Key Features of OLS:
- Restricted columns and tables are entirely hidden from unauthorized users.
- Metadata related to those objects is also not accessible.
- Measures dependent on secured objects become automatically unavailable.
- OLS provides a deeper security layer in addition to RLS.
Prerequisites:
Before applying OLS in Power BI Desktop, ensure the following conditions are met:
- Power BI Desktop (version 2025 or later) with TMDL View enabled under preview features.
- A valid Power BI Pro, Premium, or Premium Per User (PPU) license.
- A sample dataset containing both general and sensitive data.
Step-by-Step Implementation:
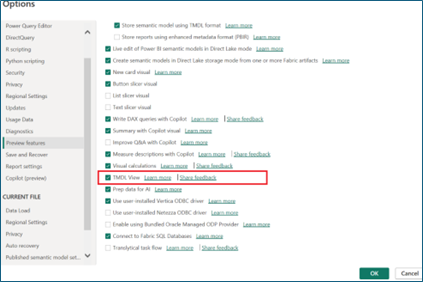
Step 1: Enable the TMDL View Feature
- Open Power BI Desktop.
- Navigate to File > Options and Settings > Options.
- Under the Preview Features section, check the box for TMDL View.
- Restart Power BI Desktop to apply the change.
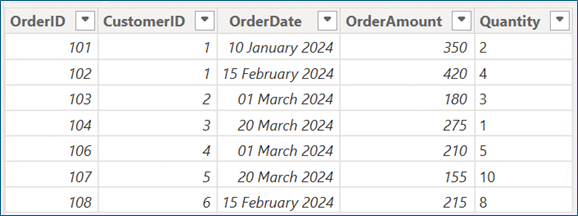
Step 2: Load the Dataset
In this example, we use an Orders table that contains various fields, including a sensitive column named Quantity. This column will be restricted and visible only to users with appropriate access permissions. The goal is to hide this attribute from users who do not need to see it by applying OLS.
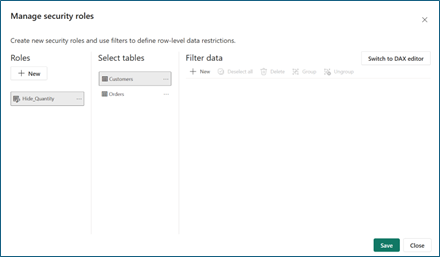
Step 3: Define Security Roles
- Go to the Modeling tab in Power BI Desktop.
- Click on Manage Roles.
- Create a new role named Hide_Quantity. Do not apply any DAX filters, as OLS does not rely on them.
This role will later be used to restrict access to the Quantity column.
Step 4: Configure OLS Using the TMDL View
- Open the TMDL View from the left pane of Power BI Desktop.
- Drag the Hide_Quantity role into the TMDL code editor.
- Modify the auto-generated code to restrict access to the Quantity column.
- Click Apply to save the changes.
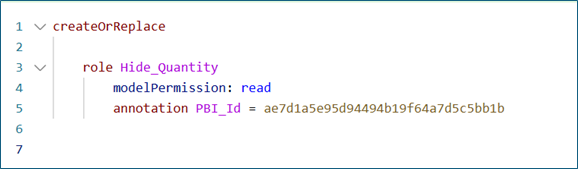
Before Code Modification:
The default code generated when dragging the role does not apply any restrictions.
After Code Modification:
Update the code as follows to hide the Quantity field:
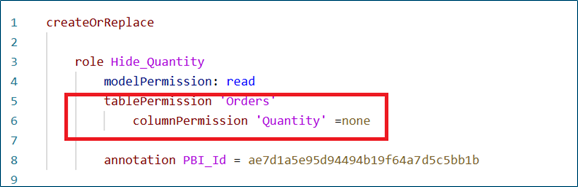
This will ensure that the Quantity column is hidden from users assigned to the Hide_Quantity role.
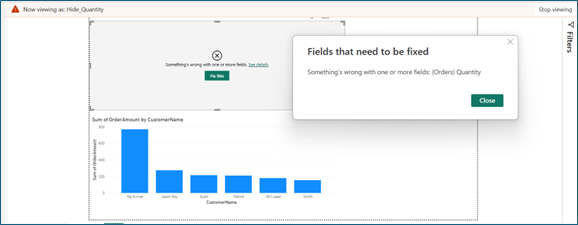
Validation:
- Return to Report View.
- Go to Modeling > View as.
- Select a role and select the Hide_Quantity role, and now we can see a visual that contains Quantity has thrown an error.
By using this approach, we can easily implement OLS from Power BI Desktop without using any external tools.
Publishing and Assigning Roles:
After successfully applying and testing the OLS configuration:
- Publish the report to the Power BI Service.
- Open the dataset settings.
- Click the ellipsis (…) next to the dataset and select Security.
- Assign the appropriate users or Azure Active Directory (AD) groups to the Hide_Quantity role.
- Click Save to finalize the role assignments.
Best Practices
- Combine Object-Level Security with Row-Level Security for comprehensive protection.
- Use the “View as” feature to thoroughly test each role.
- Maintain detailed documentation of restricted tables and columns per role.
- Regularly audit security configurations to reflect changes in organizational structure or data sensitivity.
Real-World Applications
- Finance Departments: Prevent access to salary and bonus information for non-HR employees.
- Healthcare Organizations: Secure patient data in compliance with regulatory requirements.
- Sales Teams: Allow access to sales figures while restricting commission-related data to authorized personnel.
Conclusion:
The introduction of TMDL View in Power BI Desktop significantly improves the way developers can implement Object-Level Security. By removing the need for external tools, it simplifies the setup process and enhances the security model of Power BI reports. Organizations can now secure sensitive columns and tables at the metadata level, delivering a safer and more reliable reporting experience.
When combined with other security mechanisms such as RLS, OLS helps create a robust, multi-layered defense against unauthorized data access. As a best practice, it is recommended to test all role configurations thoroughly and keep your security models up to date with organizational changes.